
The lead vehicle slowed as the driver noticed a figure standing in the roadway. Through the haze of twilight, the figure resembled a British officer, the distinctive cut of his jacket and Sam Browne belt being the tell-tale signs of a soldier of the crown. As the Crossley Tender prepared to stop, an object came hurtling through the air and landed in the cab of the truck. A tremendous explosion was followed by the shrill blast of a whistle and a torrent of rifle fire was unleashed on the vehicle. “Ambush” was shouted as those in the rear of the vehicle debussed and returned fire at the puffs of smoke that were emanating from the rocky outcrops on either side of the road. It was kill or be killed, as the Auxiliary Cadets fought a desperate battle against Commandant Tom Barry, O/C of the 3rd West Cork Brigade Flying Column of the Irish Republican Army.
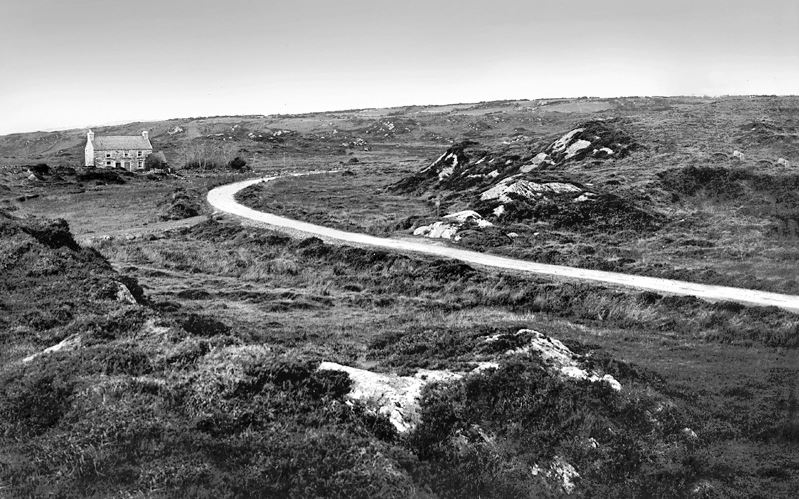
No. 2 Platoon of C Company of the Auxiliary Division of the Royal Irish Constabulary, based in Macroom Castle in County Cork, had commenced operations in West Cork and were patrolling aggressively, forcing Republican Forces to withdraw from their areas of operations. To counteract this, Commandant Barry planned an operation to destroy the force in the area. He had noticed their complacency and had decided to capitalise on their mistake. The point chosen for the ambush was on the patrol’s return journey, one and a half miles south of Kilmichael. The road took the shape of a narrow S bend that ran through a heavy bog land which sloped upwards for a couple of hundred yards to low rock and boulder-strewn hillocks. The land, mostly water-logged, was devoid of ditches and was barren except for a number of scattered rocky eminences of varying sizes.
At 09.00 hours on Monday Commandant Barry relayed his orders to his unit and began moving his men into position. The disposition of his forces were as follows,
- The command post was situated at the extreme eastern end of the ambuscade, and faced the oncoming lorries. It was a small narrow wall of bare stones, so loosely built that there were many transparent spaces. It jutted out on to the northern side of the road, a good enfilading position but affording little cover. Behind this little stone wall were also three picked fighters, John (Flyer) Nylan, Clonakilty; Jim (Spud) Murphy, Clonakilty, and Mick O’ Herlihy of Union Hill. The attack was to be opened from here, and under no circumstances whatever was any man to allow himself to be seen until the Commander had started the attack.
- No 1 Section of ten riflemen was placed on the back slope of a large heather-covered rock, ten feet high, about ten yards from the Command Post (C.P.). This rock was a few yards from the northern part of the road. By moving up on the crest of the rock as soon as the action commenced, the section would have a good field of fire.
- 2 Section of ten riflemen occupied a rocky eminence at the western entrance to the ambush position on the northern side of the road, and about 150 yards from No.1 Section. Because of its actual position at the entrance, provision had to be made so that some men of this section could fire on the second lorry, if it had not come around the bend when the first shots were fired at the leading lorry. Seven men were placed so that they could fire if the lorry had come round the bend and three if it had not yet reached it. Michael McCarthy was placed in charge of this section.
- 3 Section was divided. Stephen O’ Neill, the section commander, and six riflemen occupied a chain of rocks about 50 yards south of the road. Their primary task was to prevent the Auxiliaries from obtaining fighting positions south of the road. If the Auxiliaries succeeded in doing this, it would be extremely difficult to dislodge them, but now O’ Neill and his men would prevent such a possibility. This section was warned of the great danger of their cross-fire hitting their comrades north of the road and ordered to take the utmost care.
- The remaining six riflemen of No. 3 Section had to be used as an insurance group. There was no guarantee that the enemy would not include three, four or more lorries. Some riflemen, no matter how few, had to ready to attack any lorries other than the first two. These men were placed 60 yards north of the ambush position, about 20 yards from the roadside. From here they could fire on the stretch of 250 yards of the approach road.
- Two unarmed scouts were posted 150 and 200 yards north of No. 2 Section from where they were in a position to signal the enemy approach nearly a mile away. A third unarmed scout was a few hundred yards south of the command post to prevent surprises from the Dunmanway direction.[1]
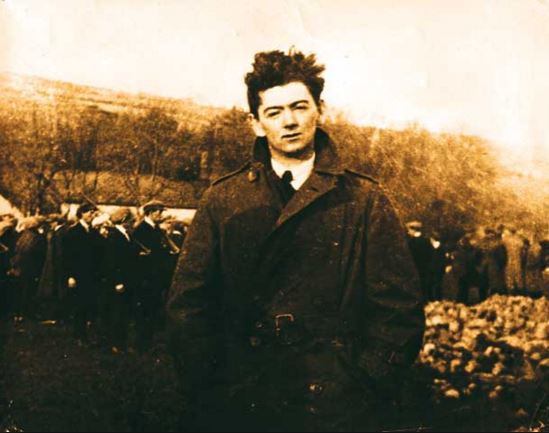
Commandant Barry planned to use the ruse of wearing a tunic and Sam Brown belt that would give the approaching Auxiliaries the impression that one of their own or that a British army officer had become stranded. This action would force the leading vehicle to slow down in the kill zone before the attack commenced. Barry stated that no quarter was to be given and none was to be expected.
On the morning of Sunday, 28th November 1920, the patrol, consisting of two Crossley tenders, moved out from their base and began their day’s patrolling. The patrol was to take their usual route of Macroom to Dunmanway and then Bandon, across the country, before returning to their base at Macroom.
The experienced group consisted of five former Royal Air Force officers, two former Artillery Officers and the remaining men were former Infantry Officers.
In the passenger seat of vehicle number 1, Platoon Commander, Francis William Crake MC, sat quietly, the noise of the engine drowning out any attempt at conversation. The first vehicle was driven by Temporary Constable Arthur F. Poole. Those taking up a position in the rear were Temporary Cadets, James Gleave, Cecil Bayley, Leonard Bradshaw, Ernest Lucas, Benjamin Webster, Philip Noel Graham and Christopher Wainwright. Vehicle number 2 was driven by Temporary Cadet Cecil Gutherie. Section Leader William Barnes, Distinguished Flying Cross, sat beside the driver. Those riding out were Temporary Cadets, Frank Taylor, H. F Forde, Fredrick Hugo, William Pallester, Albert Jones, Stanley Hugh Jones and Horace Pearson.
As dusk fell between 16.05 hours and 16.20 hours on November 28th, the first Crossley Tender, moving at high speed, came around the bend and entered the kill zone. The vehicles were travelling at 40mph and were 50 yards apart.
Barry stepped out onto the road and raised his hand. The Tender began to slow down and when it was 35 yards from his C.P., a Mills bomb was lobbed into the open cab of the vehicle. The sound of the explosion was followed by the shrill blast on a whistle which was the signal for his men to open fire. A barrage of rifle fire was unleashed at the lead vehicle which slewed across the road and came to a halt a few yards from the small stone wall in front of Barry’s C.P. The patrol commander, Crake, and the vehicle’s driver were both mortally injured by the grenade blast. As the remainder of the Auxiliaries debussed from the Tender they were caught in a hail of gunfire. Some managed to enter a laneway, but the surprise and aggressiveness of Barry’s ambush sealed their fate and the nine cadets were wiped out.
The second Crossley Tender was being engaged by No. 2 Section further back along the road. Barry pushed forward with his section and noted small groups of Auxiliaries fighting desperately within a 25-yard range of No. 2 Section’s position. The crack of rifle fire and puffs of smoke drifted through the air. The officers pulled back the bolts of their weapons ejecting the shell casings before sliding another round into the breech and firing. However, the onslaught was too much for the beleaguered T/Cadets and it is at this point that the controversy regarding ‘a false surrender’ originates.
In what some believed was an attempt to lure the I.R.A. gunmen from their concealed positions, the Auxiliaries were heard to shout ‘Surrender’. Volunteer Jack Hennessy later wrote,
We heard three blasts of the O/C ‘s (Barry’s) whistle. I heard the three blasts and got up from my position, shouting ‘hands up’. At the same time, one of the Auxies about five yards from me drew his revolver. He had thrown down his rifle. I pulled on him and shot him dead. I got back to cover where I remained for a few minutes firing at living and dead Auxies on the road. The column O/C sounded his whistle again. Nearly all the Auxies had been wiped out.[2]
As members of No. 2 Section stood up to accept their plea, the Auxiliaries drew their revolvers and opened fire killing Volunteers Michael McCarthy and Jim O’ Sullivan and mortally wounding Pat Deasy. Commandant Barry arrived on the scene and ordered his men to keep firing until ordered to stop. This rapid-fire against the remaining officers wiped out the remnants of the patrol. The ‘Surrender call’ may have been a ploy by the T/Cadets to lure their enemy from cover, but it is also possible that they may have intended to capitulate. However, on realising that the Flying Column had no intention of taking prisoners, the Auxiliaries in a desperate act may have attempted to shoot their way out. Commandant Barry was moving up the road towards No.2 Section when the incident took place. As he blew his whistle to signal a ceasefire, he was not in the position to see all the remaining Auxiliaries. With the confusion of battle, the police officers, who did the not know the insurgent signal to ceasefire, may have mistaken the signal for a final assault on their position. In doing so they decided to open fire on their assailants and were, in turn, shot down. Whatever the case, the reasons behind this episode remain a mystery to this day. The bloody battle resulted in close-quarters action and hand-to-hand combat and the deaths of sixteen Cadets and three Volunteers. The wounds inflicted may have been from rifle butts or the high velocity .303 rounds fired at close quarters, as the IRA advanced on their quarry.
Two Auxiliaries managed to survive the attack, Cecil Gutherie and H. F. Forde. Having been shot a number of times and at least once in the head, T/Cadet Henry Frederick Forde lay in the road until the following day when a column was despatched to recover the bodies of the slain men. Forde was severely disabled from his wounds but managed to recover and emigrated to Southern Rhodesia and died in 1941. Cecil Gutherie, the driver of the second Tender managed to escape and travelled across country until he was intercepted by two I.R.A. Volunteers. He was shot two days later and his body was buried secretly in Annahala bog. It was exhumed in 1926 and interred in the Church of Ireland cemetery at Inchigeela.
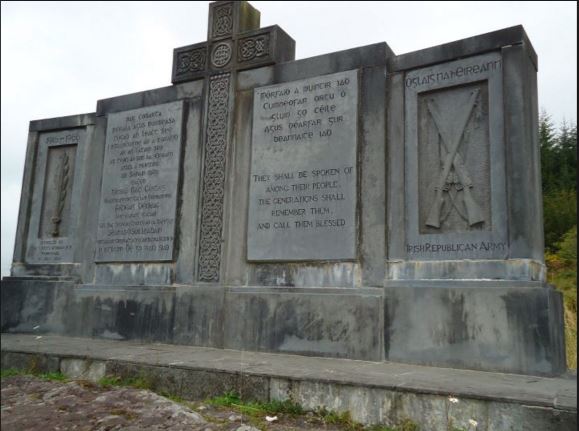
The Battle at Kilmichael was heralded as a great victory for the Irish Republican Army and as a disaster for the Crown Forces in Ireland. Insurgency and counterinsurgency warfare would continue throughout the country as each side fought on in a war that neither side could win outright.
[1] Barry, T., Guerrilla Days in Ireland (Dublin, Anvil Books, 1989)
[2] Hennessy, K., Witness Statement 1234 (Bureau of Military History 1913-1921, Dublin)